The amount of CO2 dissolved in beer varies according to taste and style of beer. The table below provides a rough guideline.
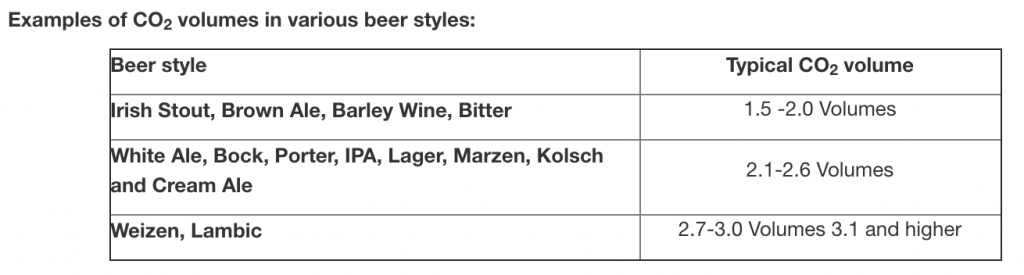
Between about 2.2 to 2.6 is a good average for most of the commonly home brewed beers, so let’s aim for about 2.4 volumes (CO2). Having decided on the degree of carbonation or level of CO2 in the beer the next step is to determine the temperature at which you wish to dispense your beer. Typically most beer is served at about ~4oC (or about 39oF).The amount of CO2 and the temperature will now determine the pressure you need to apply via the regulator to the keg. There are tables available where you simply read off the CO2volume and temperature to determine the pressure. There is also a simple calculator on Brewers Friend website: http://www.brewersfriend.com/keg-carbonation-calculator/ and another very good one here http://www.mikesoltys.com/2012/09/17/determining-proper-hose-length-for-your-kegerator/
Assuming your beer is served at 4oC and the CO2 is 2.4 volumes, the pressure required will be about 10.8 PSI (or 0.75 bar). Those living in Gauteng at higher elevations can add about 2.5PSI to account for the lower pressure (1 PSI per 2 000ft altitude).
This pressure inside the keg must be ‘balanced’ against the pressure at the tap. The system is balanced when:
Keg pressure = Pressure losses to the tap
When this relationship is out of balance; foamy, flat and/or over carbonated beer is the result. How do we balance the items on the right hand side of the above ‘equation’? There are several areas where pressure is lost from the keg to the tap outlet and these are:
· The vertical separation of the tap from the centre of the keg, basically to counteract gravity. If the keg is above the tap, which is normally the case, it looses about 1.5 PSI per meter or about 0.5 PSI per foot. If the tap is lower, it increases the pressure by the same quantity.
· The pressure loss in the tap and shank. A typical standard tap (not a flow control) and shank individually account for about 1 PSI each, so 2 PSI for the two together.
· The pour rate, some pressure is required to push the beer through the tap at a suitable pour volume – about 440ml in about 6 seconds. This will require about 5 PSI.
To balance the system the equation must be equal, so:
10.8 PSI (keg pressure) = 2 PSI (tap loss) + 0.75 PSI (keg ht assume 0.75m) + 5 PSI (pour rate) + pressure loss in the line
or simplified 10.8 = 7.75 + pressure loss in beer line
We now have to ‘bleed off’ about 3 PSI in the beer line. Beer line comes in different diameters and materials, which offer differing resistance to liquids. Typical pressure loss per meter of vinyl beer line of different internal diameter is:
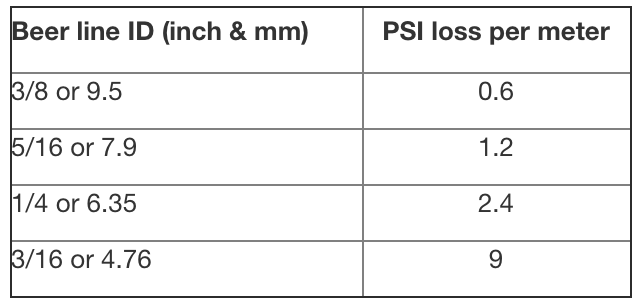
If your beer line has an internal diameter of 4.76mm (3/16inch), you will need about ~0.3m, (3 ÷ 9 = 0.3), while an 8mm beer line will require about ~2.5m (3 ÷ 1.2=2.5).
Keg temperature and pressure
It is best to keep the regulator connected to the keg all the time with the gas valve open and the regulator set at your desired pressure. Ensure that all connections are tightly sealed with hose clamps. If using a corny keg make sure the post O-rings are not worn as gas will leak and quickly empty your cylinder. Pin lock kegs need a 2.5X10mm post O-ring.
It is best to keep the beer temperature stable, as fluctuating temperature will result in CO2 moving into and out of solution upsetting the balance of the system, usually resulting in foamy beer.
If you are using a cold plate, stainless steel coil or flash chiller and the keg is not stored in a fridge, you need to adjust the pressure according to the temperature of the beer. There is a simple way to calculate the PSI/temperature relationship. If you want to carbonate your beer to 2,4 volumes of carbon dioxide, simply measure the temperature of your beer (between 1 and 35 C) and add 7 PSI to the temperature, that will put you in the right ball park, at least for the precision you can read off your gauge. So if the beer in the keg is 10C, the pressure will need to be set at 17PSI; at 15C, set it to 22 PSI – simple and easy to remember.
Most brewers have problems balancing their system and have foamy beer, they tend to over-carbonate and this is the most common cause. Simply releasing gas, especially from a full keg with little headspace, does not release sufficient gas out of the beer. This takes a long time and the headspace must be purged regularly over many hours or even days if very it is badly over-carbonated. Other causes can include: a worn O-ring on the liquid post (although this may cause beer to leak), bits of hops and other ‘things’ in the poppet and sometimes a leaking liquid dip tube O-ring – this can cause gas to push through from the keg and create foam. Also keep your beer lines clean with regular flushing with caustic soda between keg changes and clean the tap by dismantling it and washing it in warm soapy water.
See this very interesting article about typical home brew dispensing system using only carbon dioxide and not a mixed gas (which includes nitrogen). Most regulators do not have a nice range on the low pressure gauge (ideally between 0 and 30 PSI) so they can be inaccurate where we are targeting, in the 8 to 12 PSI range. It is best to experiment and see where your gauge gives the best results and mark that on the glass dial. https://www.micromatic.com/CO2_Regulator_Gauge
Pulling a pint
Pulling the first pint often creates foam, this is because cold beer from the keg is flowing through the warm beer line and tap but these soon cool and the pour will stabilise after about 100 to 200ml of beer. This is why many pubs have glycol chilled towers – nice but pricey! When pulling a pint, open the tap fully and let the beer flow unrestricted this will reduce the likelihood of foam, a restricted pour can upset the balance as it affects the pressure (like a venturri) and therefore the liquid/gas relationship. It’s like putting your finger over the end of a garden hose pipe to get the water to spay further; in pouring beer it creates turbulence and foam.
Cleaning the system
It is important that the keg, beer lines and tap are kept clean. The beer lines and tap can accumulate yeast that not only affects the flavour but can also lead to excessive foam. The method I use is:
· Clean the keg with water then fill (only only needs a litre or 2) with a caustic soda solution and swirl see link.
· Pressurise the keg and run the caustic soda solution through the beer line and leave it for ~20 to 30 min, then flush with about 500ml of sterile water and/or beer; this also flushes the beer dip tube and poppet on the keg
· Periodically the tap should be removed, dismantled and cleaned with warm soapy water to remove yeast and other residue then rinse well.
DO NOT LEAVE CAUSTIC SODA UNDER PRESSURE IN THE BEER LINE it shatters the plastic on the disconnect.
Carbonating your keg
There are a few ways to carbonate your keg, these are:
1. Chill the keg to the desired temperature (cold beer absorbs more CO2) and connect the regulator and set it to the desired pressure and leave it for a week or 10 days. Over time the CO2 will dissolve into the beer and eventually reach a stable equilibrium. Alternatively place the keg in a place where the temperture is stable, let the beer reach an equilibrium temperature, measure this temperature and dial in the approriate pressure on your regulator to achieve the carbonation level you desire and leave it at this pressure for a few days.
2. Force carbonate it. First chill the keg to about 4oC, connect the regulator and increase the pressure to about 40 PSI (3 bar). Place it on the floor or on your legs and rock it back and fourth for no more than 40 seconds with the gas connected. You will hear the gas bubbling into the keg, with the rate slowing as the beer absorbs more CO2. Be careful not to do it for too long, rather leave it a bit under carbonated as you can add more if required. Putting too much gas into the beer will create foam and can be very difficult to fix. When the time is up disconnect the gas connection at the keg to prevent any pushback of beer into the regulator (you can also install a one-way valve in the gas line to prevent this). This is unlikely, but a problem if it does occur as you could now get beer into the regulator which could be an infection source ‘growing’ in the regulator and continuously being pushed into your kegs! Leave the beer to stand and settle for a few hours. Purge gas from the headspace (I do this to ensure the keg is not at a higher pressure than the regulator). Before reconnecting the regulator reset it to the dispensing pressure. You will need to release pressure in the gas line. If your regulator has a purge valve this is easy, if not you must push the ‘pin’ inside the disconnect. It may still require a day or two to stabilise around your target pressure. It is better to under-carbonate than over-carbonate, the former will stabilise quickly, the latter can take a long time with lots of foamy and flat beer and hop flavours lost and the careful balance you created brewing your beer upset.
If you have the time always use the first method. The second can be a bit hit and miss and you can easily over carbonate your beer and once this occurs it is difficult to get it back to the proper setting. Simply bleeding off CO2 will release the gas in the top of the keg (headspace), but most of the CO2 is dissolved in the beer and it takes time to come out of solution and stabilise. You may need to purge it several times over the course of several hours to release the excess CO2. It’s the same principle for those who are divers; you will know that you need to allow the gasses in your blood to stabilise if you have dived deep for too long. That’s why you stop at certain depths to allow the nitrogen to ‘dissolve’ out of your blood; if you come up too fast it forms a gas with loads of pain. Slowly is better as with carbonating beers – not true for drinking them!!
A middle of the road solution is to set your regulator to the desired pressure and then rock the keg for a couple of minutes I do this to ensure the keg is not at a higher pressure than the regulator and then allow it to stand connected to the regulator in the fridge; it will reach equilibrium in a day or two. This may save you a few days using the first method and is less likely to result in over carbonated beer.
My pet hate is visiting pubs, often with micro breweries, who create great beer and then do not sort out their pressure and balance their gas lines. How many times have you seen and barman or woman, pulling a pint with loads of foam overflowing from the glass, wasting beer, and serving you beer not as the brewer intended it. All that effort wasted in the last few meters!
Carbon Dioxide
There are a few options for carbonating your beer, these include:
- Use a CO2 fire extinguisher, these are available from some hardware stores and can be refilled at most fire extinguisher service agents. This is not food grade CO2 and you use it at your own risk. Many home brewers use it because of price and convenience.
- Food grade CO2 is available in small bottles of 1,34 litre and a larger 1,2kg bottle which can be purchased from My Gas, these operate on an exchange basis. My Gas are located in most large centres and may offer delivery for a fee. Larger 5 kg and bigger must be hired. They also offer mixed gas options (Nitrogen and CO2).
- Soda Stream bottles are also an option but then a regulator and an adapter is required as they do not have a standard CO2 thread.
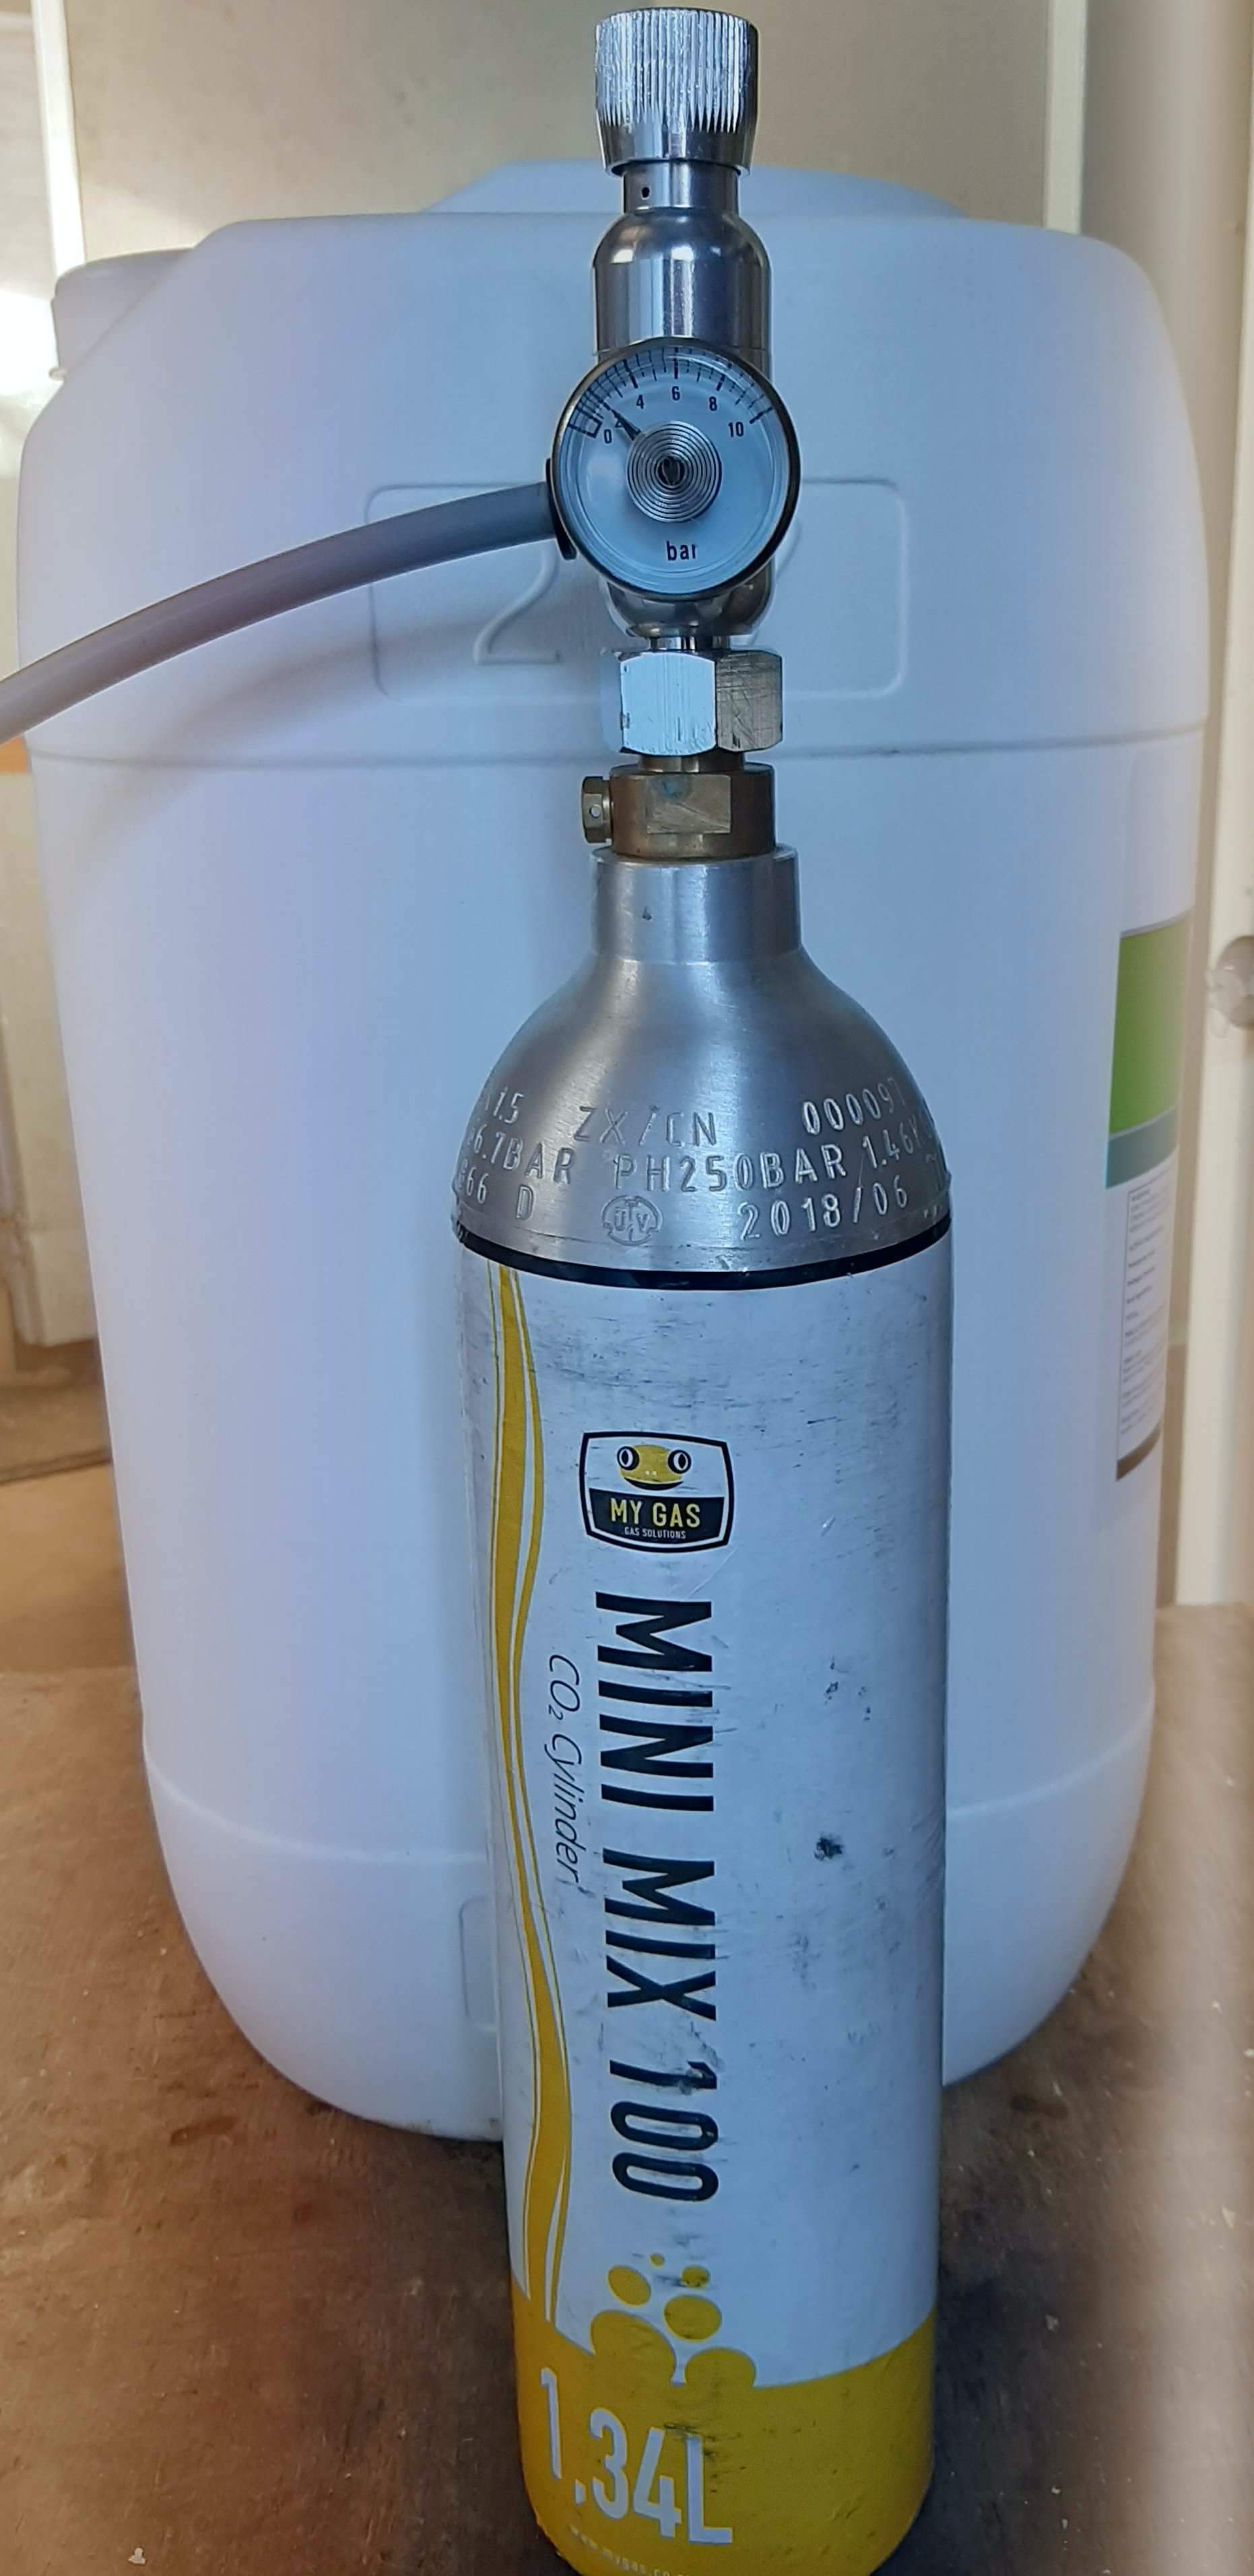
The small 1,34 litre bottle from My gas has the same thread at the 60 Soda Stream bottle but they sell a small regulator which fits on this bottle (see picture below). The regulator however has a rather small gauge and it is difficult to set it accurately especially around 1 bar, where home brewers typically set their gas pressure.
A few points about Fire Extinguishers
- Fire extinguishers, aside from not using food grade gas, also have valves which are not designed to work under pressure when the valve is open (the regulator is now the control valve), as a result the O-ring seal often fails and leaks. In my experience, replacing the standard ‘trigger type’ valve with a screw valve also seems to suffer from the same problem. ‘Proper screw valves’ can be installed but these are VERY expensive. The older brass type valves found on older extinguishers seem to be more reliable.
- Fire extinguishers have a dip tube which draws liquid CO2 from the bottom of the cylinder and when drawing large volumes of CO2, such as when force carbonating a keg, this can cause the regulator to freeze. Once they have thawed they seem to continue to function thereafter. Some fire extinguisher service agent will remove this dip tube when you refill if you ask them. You can also turn the extinguisher upside down if this is a problem.